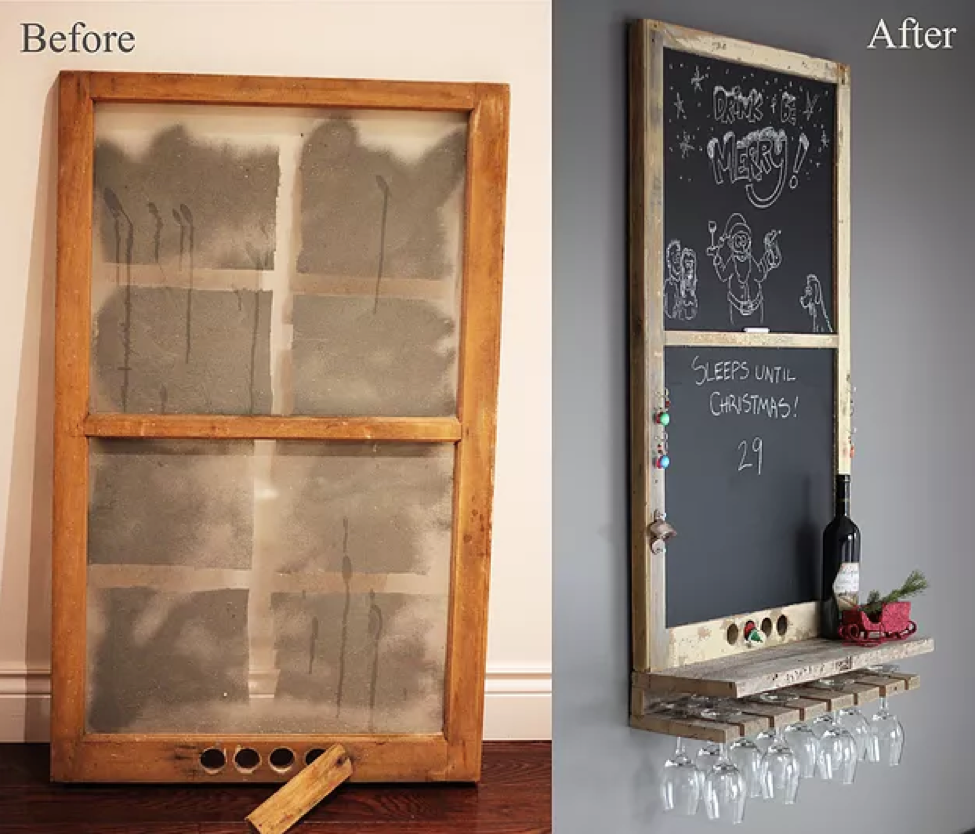
Winter DIY: window wine rack chalkboard
Jan 16, 2018, 14:20 PM
DIY projects and home renovations are great ways to keep your mind busy during the long winter months, and give you a whole new appreciation for the indoors. We asked Handyman Chris Palmer for a simple-yet-impressive DIY project to tackle this winter that was equally fun for adults and kids.

Below, you’ll find some simple instructions on how to assemble your very own window wine rack chalkboard.
Frame
1. Take a reclaimed window that you've sourced, prep it to either a bare wood surface, or leave it in its distressed state with the faded, blemished paint finish.
2. With a measuring tape, find the dimensions of where the glass used to sit, and use those measurements to cut your handy panel or "hardboard" that you will use for the chalkboard.
3. Prime your panel with either the magnetic primer or a plain primer. Note that chalkboard paint won't make the board magnetic, but the primer will. Once the board(s) has been primed, you can start your chalkboard paint. You will generally need at least two coats to achieve an authentic chalkboard finish.
Window Bar Ledge
1. Using a reclaimed board, find the depth you feel comfortable with. Chris recommends at least 9". Now, cut this piece to the same width as your window’s frame that you plan to fasten it to. But don't fasten it just yet! If you plan on making the wine glass holder, you'll want to assemble this altogether before attaching it to the frame.
2. For the wine glass holder, take a piece that is similar to the size of your ledge, cut the width to match, and find 2 wine glasses. Place them side by side so that you have around 1" between the two and mark where the center of the glasses sit. Using this measurement, calculate how many glasses fit on the edge. Remember, leave 2" of wood at the ends of the wood so that it doesn't become too weak.
3. Now that you've marked the centers, figure out the depth from where you can drill your hole. Place the glass on the wood so the base flare is 2" from the edge and mark the center perpendicular to the spacing you already have marked. Now, continue this line across all the way so that you have made multiple cross hairs for a drill bit.
4. Take a 1" holesaw, spade bit or forstner bit and drill a hole on the cross hair. Take your speed square and mark a line parallel to the spacing lines coming from the edge of the hole for your jigsaw to follow. Now, cut all the slots for the glasses, and you should have a perfect wine glass holder.
5. For the last piece, cut a 1" x 3" piece that is the same width as the rack and ledge, and use this to space the two pieces apart. Now, you can glue and screw the top ledge to this piece and then do the same from the underside to the rack.
6. To attach this to the frame, Chris recommends pre-drilling through and counter sinking (1/2" deep) into the window frame from the inside heading down through the bottom. This way the screws are hidden and removable if necessary.
7. Pop your chalkboard panels into the frame. Use finishing nails or glazier points to hold the boards in place as you would with the glass.
At the end, you’ll now be left with a masterpiece you can be proud of that is fun yet functional!
To get Chris’ inside scoop on the top renovations to boost the value of your home, don’t miss his presentation on our Main Stage on Friday, January 19 from 3:30-4:30pm and Saturday, January 20 from 3-4pm. What are you waiting for? Get your tickets NOW!

)


